
Saving Energy: Blown Attic Insulation
Save $1,000 on labor and cut your heating bills
Overview:
If you need to add insulation in your attic, save big by blowing in cellulose insulation yourself.
The pros charge $1,500 to $2,000 to do a 1,200-sq.-ft. house. You can do it yourself for about $500.
Blowing attic insulation isn't hard, but it's dusty, sweaty work. To make it easier,
grab a helper and set aside two days: one for attic prep and the second to actually blow the insulation.
By the end of the weekend you're going to be sore and tired. But saving $1,000 or more will make up for your aching back.
The long-term payoff is impressive too. You could see your energy bills go down by as much as 15 to 25 percent depending on your climate and existing levels of insulation. And you may also qualify for a tax credit on the cost of the insulation (check with the IRS or at energystar.gov).
To show you how to do the job right, we asked our expert to share his tips for making the job go smoothly and help you avoid the top three attic-insulation mistakes.

Arne Olson - Our Insulation Expert
Arne Olson, the owner of Houle Insulation in Minneapolis (houleinsulation.com), has insulated more than 5,000 homes. A lot of those homes were insulated by DIYers who didn't know what they were doing, says Olson. They didn't use enough insulation and they didn't seal up the attic bypasses or put in vent chutes. Olson says it's also common for older insulation to settle over time. But you can blow cellulose over whatever kind of insulation is already there, and this is a great DIY project for someone who doesn't mind working up a sweat.
Seal attic bypasses
Photo 1: Seal air leaks
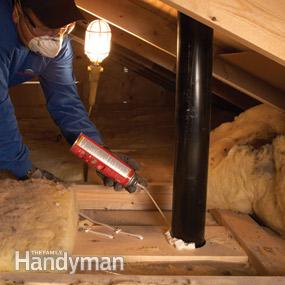
Pull back the existing insulation and use expanding spray foam to seal any gaps around plumbing pipes, ceiling perforations and holes where electrical wires snake through. Make sure to seal all the way around the pipe, says Olson. For gaps 1/4 in. or less, use caulk rather than expanding foam.
Leaks from cracks and gaps around lights, plumbing pipes, chimneys, walls and other ceiling penetrations are the equivalent of having a 2-ft.-wide hole in your ceiling. The worst offenders are open stud and joist cavities and dropped soffits and ceilings in kitchens and baths (see Photo 1).
Install or repair vent chutes
Photo 2: Add vents
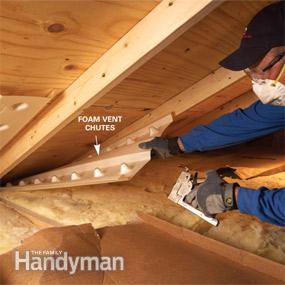
Pull the existing insulation away from the roof. Position the new vent chute so the bottom extends 6 in. into the overhang and staple it into place. Olson suggests using a squeeze stapler instead of a hammer stapler. It's more accurate and there's less chance you'll crumple the chute.
In 95 percent of the homes we work on, the vent chutes are missing or aren't properly installed, says Olson. Without them, you're not getting the most out of your insulation's R-value because air needs to move properly at the eaves to remove moisture in the winter and heat in the summer.
To make sure existing chutes aren't blocked, stand in a dark attic to see whether light from the eaves is filtering through the vents. Replace any chutes that are blocked, damaged or missing. You'll find both plastic and foam vent chutes at home centers. Olson recommends using foam chutes. They're more rigid and there's less chance of them getting crumpled or compressed when you're installing them. Pull back the existing insulation so you can see out to the edge of the eaves, and install a vent chute in every rafter space (Photo 2).
Dam and insulate the attic access
Photo 3: Insulate access doors
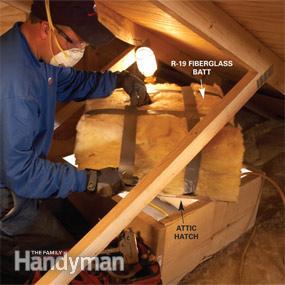
Cover the attic hatch with a pillow of fiberglass insulation. You want a nice, big puffy pillow of insulation to stop any air leaks, says Olson. Cut two layers of R-19 fiberglass batt insulation slightly larger than the hatch and staple duct tape to the hatch edges to secure it in place.
To keep the insulation from falling through the attic hatch opening, make a 2x12 dam around the hatch perimeter. Then, to really seal the attic access up tight, says Olson, lay fiberglass batt insulation on the inside of the hatch or door and wrap it up tight like a Christmas present (Photo 3). You can insulate the hatch door while you're inside the attic or slide the door out and do it more comfortably on a tarp outside.
Mark your final insulation level
Photo 4: Mark reference lines
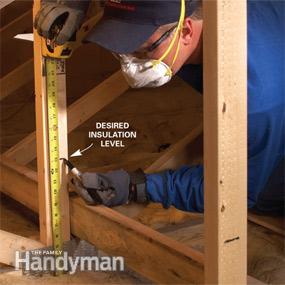
Measure up from the drywall to mark your desired insulation level. Use a permanent marker to mark the level every few trusses so you know you have even coverage around the entire space.
When you're blowing insulation, it can get dusty and hard to see whether you've got it deep enough around the entire attic. Mark the desired level on different roof trusses around the attic before you start (Photo 4).
Pick up the blower and insulation
Cellulose insulation is a good choice for DIYers. It has a higher R-rating and is less expensive than either blown fiberglass or fiberglass batts. It's an environmentally friendly material made from recycled newspaper, so it's easier on your skin and lungs. And you can blow it easily and quickly into odd-shaped spaces in an attic, where access is limited and dragging up batts is tough.
Most home centers sell bagged cellulose insulation, and many provide the blower for a minimal fee or free when you buy a certain number of bags (usually 10 or more). You can also rent the blowers from a rental center. Although rental machines aren't as powerful as the truck-mounted units the pros use, Olson says they work fine for a DIYer.
To determine how many bags you'll need, measure your existing insulation so you know your current R-value and subtract that from the recommended levels (see Do You Need to Add Insulation? for how to find recommended levels for your ZIP code). Check the chart on the insulation bag to determine the number of bags necessary to reach your desired R-value based on the square footage of your attic. Olson recommends buying more bags than you think you'll need. You can always return them, and you don't want to stop in the middle of the job because you've run out.
Do You Need to Add Insulation?
The answer depends on where you live, the heating and cooling costs in your area, your existing insulation levels,
local codes and more. The first step is to make sure you've sealed your attic bypasses.
Then visit www.eere.energy.gov and do a search for ZIP-Code Insulation Program.
Use the insulation calculator to plug in your ZIP code, lifestyle factors, building design,
energy costs and budget to get a detailed recommendation.
The recommended insulation level for most attics is R-38 (or about 12 to 15 in. from the drywall, depending on the insulation type). In the coldest climates, insulating up to R-49 is recommended.
Set up the blower
Photo 5: Fill the blower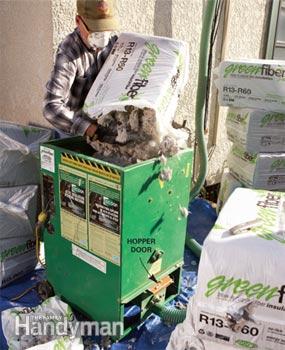
Have your assistant crumble the compressed cellulose as he loads the hopper so it doesn't clog the hose. If the cellulose comes out too fast or too slow, adjust the hopper door. The blower machine is loud, and you and your assistant won't be in visual contact. Communicate with each other using a walkie-talkie or cell phone. You can also click the blower control switch on and off several times to get your helper's attention.
The blower machine is heavy, so have your partner along to help you load and unload it. Set the blower on a tarp on flat ground near the window or vent opening closest to the attic access. Your helper will feed the insulation into the hopper while you work the hose up in the attic (Photo 5).
The blower should include two 50-ft. hoses that you can connect and snake into the attic. If your hoses have to wind their way through the house to reach a scuttle (the attic access) in a hallway or closet, lay down tarps along the way. It keeps things neater during the process and makes cleanup a lot easier.
Connect the hoses with the coupler and then use duct tape over the coupler to secure the connection. Those metal clamps can vibrate themselves loose, says Olson. You don't want them to get disconnected and have cellulose sprayed all around your house.
Blow the insulation
Photo 6: Fill to your marks
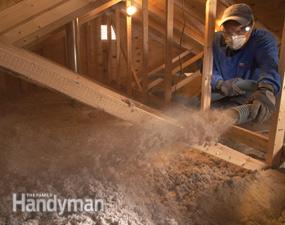
Start at the farthest point from the hatch and sit in the center of the attic. Don't move around a lot in the attic with the hose, says Olson. Work from the middle and do three bays at a time. Push the hose out to the eaves and blow those areas first. Then pull the hose back and use a slow, steady sweeping motion until you reach the desired level. Then pivot in place and blow the opposite side of the attic the same way.
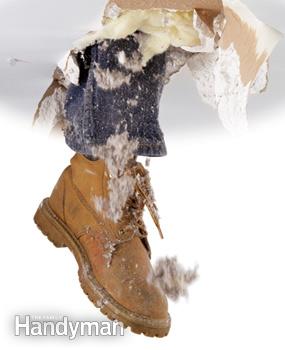
Wear eye protection, a long-sleeve shirt and gloves, and a double-strap mask or particulate respirator. Start as far away from the access panel as possible and blow the eaves and other tight spots first. For hard-to-reach areas, duct tape a length of PVC pipe to the end of the blower hose. As you work back into corners and around eave vents, don't cover any ventilating areas.
You can blow three rafter bays on each side of the attic from one position. Let the hose sit on the drywall to fill the eave areas, giving it a shake to move it from bay to bay. For the center areas, hold the hose level and blow the insulation evenly until you've reached your level lines (Photo 6). Then pivot in place and do the same thing to the other side. Move across the attic until you've hit your desired height at every point. Blow the rest of the insulation until the hopper is empty. You'll end up with a clean blower, and the extra inch or two of insulation will settle over the next few months.
The 3 Most Common DIY Insulation Mistakes
Mistake #1: Not sealing attic air leaks first
No amount of insulation is going to help if you don't seal your attic properly, says Olson.
Mistake #2: Not getting insulation out to the edges
When you're prepping the attic, use a broom handle or stick to push the existing insulation out to the edges.
Then when you blow in the cellulose, make sure you do a good job of getting it way over to the eaves with the hose.
Mistake #3: Stepping through the ceiling
It happens all the time, says Olson. You've got to move around slowly and step from joist to joist.
If there's no floor, bring up a 12-in.-wide piece of 3/4-in. plywood and lay it across the ceiling
joists to use as a platform to work from. And wear rubber-soled shoes so you can feel the joists
through the bottom of your feet.
Author: The Family Handyman
Credit: http://www.familyhandyman.com/DIY-Projects/Indoor-Projects/Attics/Attic-Insulation/saving-energy-blown-attic-insulation/Step-By-Step
FREE Estimate